Basic System Functions
Below are the basic system functions and their purpose.
Navigation
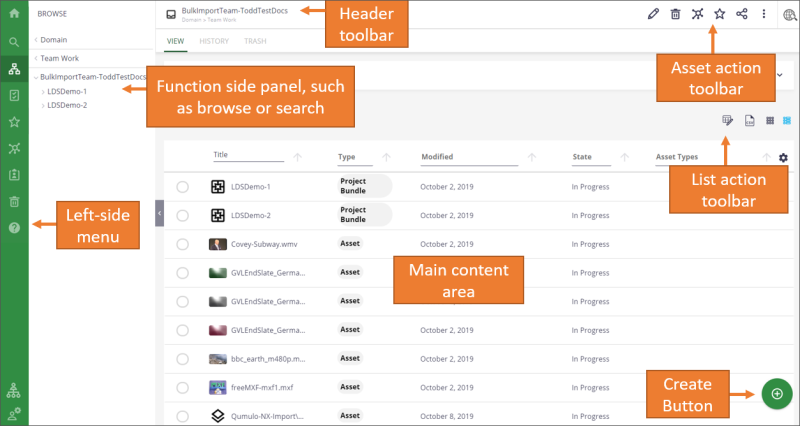
The following are the basic areas on a Nuxeo screen.
- The left-side menu contains the main functions: Home, Search, Help, Browse, Tasks, Favorites, Collections, Clipboard, Trash, Administrators, User Settings.
- Selecting a left-side menu icon opens a side panel, such as the browse or search screen. You can hide the side panel by clicking the left-side menu icon again.
- The Header Toolbar across the top lists the page or asset title, a breadcrumb trail (that you can click to navigate), and a quick search.
- At the top right is the Asset Action toolbar. You will see icons or links to actions such as edit, approve, share, etc.
- Above folder, search results, and collections are list actions.
- The main content area is where folder contents, search results, or asset details are displayed.
- The Create button is used to add folders and import assets.

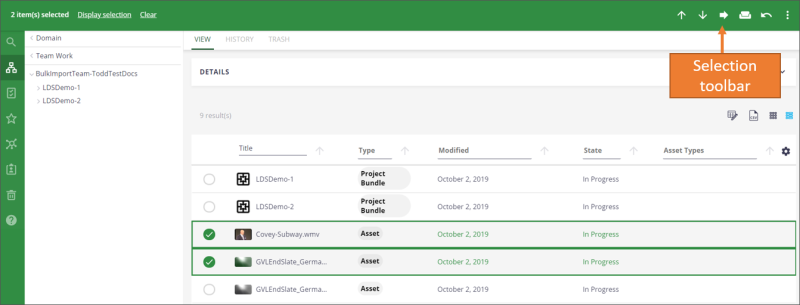
- If you select several assets from folder content or search results, then a Selection toolbar appears with actions you can take on your selected assets.

Dashboard
Every user has a dashboard that appears when they first log on. The dashboard displays:
- Recently Edited: This provides a quick link to something you are working on.
- Recently Viewed: This provides a quick link to items you searched for and viewed.
- Tasks: In this system, you can assign tasks to someone else, such as assigning a cataloger to add metadata to a set of photos a photographer recently added, assigning an editor to upload the language video to the metadata record a cataloger created. Tasks assigned to you show up on your dashboard.
- Favorite Items: This can provide a quick link to something you are working on.
You can return to your dashboard by clicking the Home (![]() ) icon in the left side menu or press “D” (for Dashboard) on the keyboard.
) icon in the left side menu or press “D” (for Dashboard) on the keyboard.
Search
There are several types of searches available (see "Searching for and Viewing Assets: Overview").
-
Quick Search: At the top right of every screen, a quick search (
 ) is available. This basically searches everything in the system (metadata, assets, users, groups, etc.).
 -
Asset Search: Click the Search (
 ) icon on the left to search for assets in:
-
Production Templates: Searches assets found in the Global Visual Library folder, such as beginning or ending slates, templates, or official general authority portraits.
-
Production Assets: Searches assets in both the Approved Content and Team Work domains. This search includes tags, along with metadata. Tags must be typed exactly as they appear (such as lower-case). However, tags do not show in the search results, only when viewing the asset.
-
Licensed Stock Library: Searches assets found in the Licensed Stock folder, such as images from Adobe Stock, Getty, etc.
-
Scripture Asset Library: Searches assets found in the Scripture Library folder, such as Book of Mormon visual assets.
-
Browse
Besides searching, you can click the Browse (![]() ) icon to browse for items (see "Browsing and Filtering For Assets"). These are organized into “Domains.” You can think of a domain as a group of content. Under each domain is a hierarchy of folders and items in a folder. Security and permissions are tied to folders. For example, if you have write permission for a parent folder, you will have write permission for any children folders. You can also set permissions on an individual asset, if needed. So domains are used to provide security and tracking for items. Because of that, you will only see the domains, folders, and items in a folder that you have permission to view or edit. There are three types of domains.
) icon to browse for items (see "Browsing and Filtering For Assets"). These are organized into “Domains.” You can think of a domain as a group of content. Under each domain is a hierarchy of folders and items in a folder. Security and permissions are tied to folders. For example, if you have write permission for a parent folder, you will have write permission for any children folders. You can also set permissions on an individual asset, if needed. So domains are used to provide security and tracking for items. Because of that, you will only see the domains, folders, and items in a folder that you have permission to view or edit. There are three types of domains.
Approved Content
Published content appears in the Approved Content section. Folders are created for the different types of content:
- Global Visual Library: Templates (business and production), design elements, and official portraits.
- Licensed Stock: such as Adobe Stock. Note: For Adobe Stock, as assets are licensed, the system will automatically copy them over to Nuxeo each day.
- Music Library
- Scripture Library: Book of Mormon and Bible visual library.
- Product Tree: All other products.
When an asset is approved and ready to be published, the publisher selects which folder to place it in the Approved Content section.
Master Data
This is the master metadata templates for metadata being copied from other systems, such as RMS and Workfront, and lists that appear when you are adding metadata. For the most part, the Metadata and Technology Data Analyst will add data to this section.
- Products: Copies metadata from the product database (IBM Case Manager) based on the PD number added to an asset.
- Projects: Copies metadata from Workfront based on the PRJ or Production reference number and any Task reference numbers added to an asset.
- Contracts: Copies metadata from the Rights Management System (RMS) based on the contract numbers, RS-statements, or certification numbers added to an asset.
- Languages: List of languages.
- Series: Lists of series, seasons, or episodes.
- Events: Lists of events.
- People: List of people.
For most lists, if you do not see the item you want to add, contact the Metadata and Technology Data Analyst. In the Master Data section, list items can either be entered individually or imported from a .csv spreadsheet.
PSD Delivery Portal
Select PSD groups can publish content to a folder in this section to send it to other PSD groups for final delivery or publishing.
Team Work
The Team Work space allows teams to add assets and work with them until they are ready to be published. Workspaces are a dynamic environment where you can add, edit, and work with assets. A workspace will be provided for each production team. The team can decide how best to organize their workspace. They can organize it by project, or by groups, or by the type of work being done. No one else can view the team work assets except the team members assigned. The Asset Management Partner (AMP) manages permissions within the team work space. The system will start with the following teams:
- Church Headquarters
- Broadcast/Events: Will have subfolders for Newsroom, Audio Editing, and Video Editing
- Executive Communications
- Photography
- Film/Video: Will have subfolders for Audio Project, DIT/LAB, Post Finishing, and Video Editing
- Motion Graphics and Animation
- Publishing
- Translation
- Areas: Asia , Asia North, Africa Southeast, Africa West, Brazil, Caribbean, Central America, Europe, Europe East, Idaho/North America Central, Mexico, Middle East/Africa North, North America Northeast, North America Northwest/West, North America Southeast, North America Southwest, Pacific, Philippines, South America Northwest, South America South, Utah.
If needed, assets can be copied or moved to other workspaces while in the “In Process” state.
CHD Search
Those who belong to the Church History (CHD) Review team will see the CHD Search ( ) icon. Click the icon to search for possible assets to import into Church History Archives.
Tasks and Workflows
The system allows you to create tasks and assign it to someone (see "Assigning a Task"). To view tasks assigned to you, click the Task (![]() ) icon on the left-side menu.
) icon on the left-side menu.
Workflows allow an asset to travel a path between people and tasks to speed up production. Workflows can either be a single path from one person to the next, or allow parallel paths between several people. For example, there will be a workflow created for approval for an asset from one or more of the appropriate groups (IP, Correlation, VIO).
Favorites
You can add assets to your favorites list so you can quickly return and finish work on them. You can view your favorites on your dashboard or by clicking the Favorites (![]() ) icon on the left-side menu (see "Adding Assets to Your Favorites").
) icon on the left-side menu (see "Adding Assets to Your Favorites").
Collections
Collections provides a way to view or share a set of images. You can create a collection of assets and then assign someone a task to perform an action on these assets, such as doing some editing work, adding metadata, or providing approval. To view your collections, click the Collections (![]() ) icon on the left-side menu (see "Adding Assets to a Collection").
) icon on the left-side menu (see "Adding Assets to a Collection").
Personal Space
The personal space (![]() ) is the default location for your collections and favorites (dashboard gives quick access to favorites).
) is the default location for your collections and favorites (dashboard gives quick access to favorites).
Clipboard
The clipboard (![]() ) is used to copy or move items from one folder to another (see "Copying or Moving an Asset (Clipboard)").
) is used to copy or move items from one folder to another (see "Copying or Moving an Asset (Clipboard)").
Trash
The trash (![]() ) stores deleted assets until the trash is emptied by Administrators (see "Deleting Assets").
) stores deleted assets until the trash is emptied by Administrators (see "Deleting Assets").
Help
Click the Help (![]() ) icon on the left menu, and then click Help Section to access the online help. There is a table of contents, or you can search for help. PDF copies are also available.
) icon on the left menu, and then click Help Section to access the online help. There is a table of contents, or you can search for help. PDF copies are also available.
Administrators
Administrators (![]() ) have access to add users and groups, assign permissions, and view analytics within the system.
) have access to add users and groups, assign permissions, and view analytics within the system.
User Settings
You use user settings (![]() ) to view your groups and permissions, download Nuxeo Drive, and log out. If you need more permissions for a folder or set of assets, see your Asset Management Partner (see "Viewing Profile Information").
) to view your groups and permissions, download Nuxeo Drive, and log out. If you need more permissions for a folder or set of assets, see your Asset Management Partner (see "Viewing Profile Information").
Nuxeo Drive
This is a separate application, much like OneDrive or Dropbox where you can sync files in the system with your computer. This may make it easier to edit or work with files while they are “In Process” (see "Installing and Configuring Nuxeo Drive").