Adding Assets to a Collection
You can create collections to view and share assets. This may be helpful for creating ad-hoc reports, such as an IP report, or when assigning someone a task to perform with a set of assets. Note: Assets are not moved or copied into a collection; they are only linked to where they are located in a folder.
To share assets with a vendor or external user, see Using EasyShare.
- Locate the asset or assets by doing one of the following:
- Search for an asset and open the asset details.
- Search for assets and select the assets on a search results screen.
- Browse for assets in a folder and select the assets.
- At the top right, select Add to Collection (
 ) or select it from the More (
 ) drop-down list.
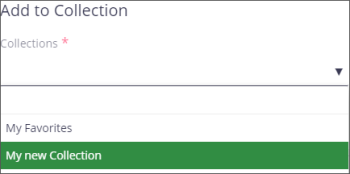
 - On the Add to Collection window, select a collection or select “My New Collection.”
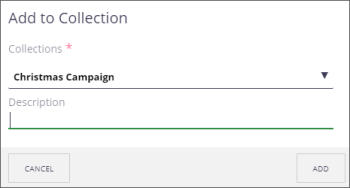
- Select the field again, enter a collection name, and select it.
- Enter a description and click Add.


Viewing a Collection
You can view the assets in the collections you create.
- On the left-side menu, click the Collections (
 ) icon.
 - Click a collection title to see the list of assets.
- Click an asset to view the asset details. The list of assets will move to the side-panel.
- At the top left, click the arrow (
 ) by the collection name to return to the collection list.
Removing Assets from a Collection
If needed, you can remove assets from a collection.
- On the left-side menu, click the Collections (
 ) icon.
 - Click a collection title to see the list of assets.
- Select one or more assets to remove.
- At the top right, click the Remove from Collection (
 ) icon to remove the items.
Sharing a Collection
You can share you collection with another user.
- On the left-side menu, click the Collections (
 ) icon.
 - Click a collection title to see the list of assets.
- At the top right, click the Share (
 ) icon or select it from the More (
 ) drop-down list.
 - On the Share window, enter and select recipients from the drop-down list, add comments, and click Send. Note: Recipients must be Nuxeo users.
- If needed, you can set permissions for the collection. Click the Permissions tab and add a local permission. See “Adjusting Permissions for an Asset or Folder” for instructions.
- Read: This allows the person to view the collection.
- Can Collect: This allows the person to add or remove items in the collection.
- Edit: This allows the person to edit the title or description of the collection, as well as read and collect.
- Manage: This allows the person to share access with others.