Bulk Importing Assets
Only certain individuals or groups will have permission to use the bulk import function. Currently, the system can perform five simultaneous import requests. For multiple requests, bulk import items may be placed in a queue and you will receive emails when 1) it is placed in a queue, 2) it is starting import, and 3) importing is completed. (Note: Sends emails to address of logged-in user. Emails list the source path in the title along with the status, such as "Started" or "Completed.")
Currently, you can import files up to 600GB in size.
File Names
When you import assets (video, audio, images, documents), the title is required. The system automatically inserts the file name as the title until a title is supplied. Name asset files using the Asset Naming Standards and Media Server File Name Standards. File names should be 128 characters or less.
When naming files, do not use the following characters:
- (< >) Less than or greater than
- (:) Colon
- (") Double quote
- (/ \) Forward or back slash
- (|) Vertical bar or pipe
- (?) Question mark
- (*) Asterisk
-
Integer value zero, sometimes referred to as the ASCII NULL character (sometimes transferred when copying and pasting)
Importing
- Set up a folder on a Nuxeo-Import source location, such as Palmyra, Fayette Photo, or MMO (default is \\cob-hds-1.ldschurch.org\Nuxeo-import) and place all the files you need to add in that folder. You can create a folder with sub-folders and then either add all the assets from the parent folder, or just the assets in a sub-folder.
- In Nuxeo, browse to the appropriate Team Work folder where you want to add the assets. Note: It must be a project bundle or asset folder (not a team folder).
- At the top right, click the More (
 ) icon and select Bulk Import (
 ). This will note the location (target path) in Nuxeo where the files should be added.
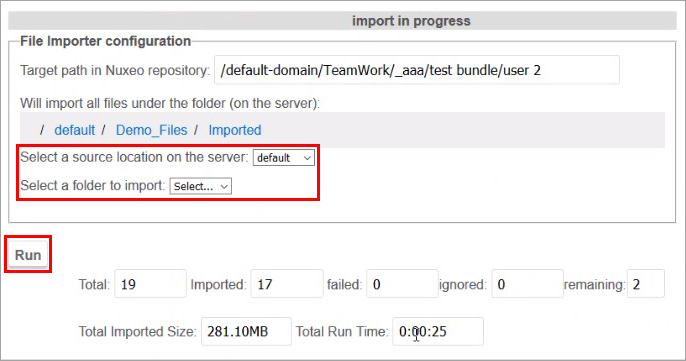
 - In the Bulk Import window that appears, select the “source location on the server,” such as Palmyra, Fayette Photo, or MMO. (The default is “/mnt/Qumulo-NX-Import.”)
- Select the “folder to import.” This should be the folder you created on the Nuxeo-import location.
- Click Run. The files will be imported and the progress will be listed on the window. When it is complete, it will list “Import Completed” at the top. You can edit the files later to add the metadata. To edit metadata for multiple files, see "Editing Metadata for Several Assets at Once" After clicking Run, these other options appear:
- Cancel Import: This will stop the import.
- Click View Summary to check the log file for failed files. This button appears after the import has completed. It will download the BULKIMPORT-JOB spreadsheet with details about the import, including a list of all the files that imported, their size, and status (imported or failed). You can do a checksum on the "size" to check the combined file size. You can click a column header, such as "status" to filter the list to only show files that failed. Note: This spreadsheet is also attached to the completed email for queued jobs.
- Close this browser window.
Note: Any .DS_Store, .db, ._test, .pek, Info.plist, and Frame 0 - 1023 files will not be imported.

Note: If you import a folder with sub-folders, the sub-folders will be imported as asset folders with their assets.